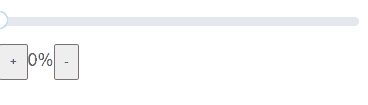
本文实例为大家分享了vue实现拖拽进度条的具体代码,供大家参考,具体内容如下
组件代码:
<template>
 <div>
  <div class="slider" ref="slider">
   <div class="process" :style="{ width }"></div>
   <div class="thunk" ref="trunk" :style="{ left }">
    <div class="block"></div>
    <div class="tips">
     <!-- <span>{{scale*100}}</span> -->
     <i class="fas fa-caret-down"></i>
    </div>
   </div>
  </div>
  <div>
   <button
    @click="
     () => {
      this.per++;
     }
    "
   >
    +</button
   >{{ per }}%<button
    @click="
     () => {
      if (this.per > 0) {
       this.per--;
      }
     }
    "
   >
    -
   </button>
  </div>
 </div>
</template>
<script>
/*
 * min 进度条最小值
 * max 进度条最大值
 * v-model 对当前值进行双向绑定实时显示拖拽进度
 * */
export default {
 props: ["min", "max", "value"],
 data() {
  return {
   slider: null, //滚动条DOM元素
   thunk: null, //拖拽DOM元素
   per: this.value, //当前值
  };
 },
 //渲染到页面的时候
 mounted() {
  this.slider = this.$refs.slider;
  this.thunk = this.$refs.trunk;
  var _this = this;
  this.thunk.onmousedown = function (e) {
   var width = parseInt(_this.width);
   var disX = e.clientX;
   document.onmousemove = function (e) {
    // value, left, width
    // 当value变化的时候,会通过计算属性修改left,width

    // 拖拽的时候获取的新width
    var newWidth = e.clientX - disX + width;
    // 拖拽的时候得到新的百分比
    var scale = newWidth / _this.slider.offsetWidth;
    _this.per = Math.ceil((_this.max - _this.min) * scale + _this.min);
    _this.per = Math.max(_this.per, _this.min);
    _this.per = Math.min(_this.per, _this.max);
    _this.$emit("input", _this.per);
   };
   document.onmouseup = function () {
    document.onmousemove = document.onmouseup = null;
   };
   return false;
  };
 },
 computed: {
  // 设置一个百分比,提供计算slider进度宽度和trunk的left值
  // 对应公式为 当前值-最小值/最大值-最小值 = slider进度width / slider总width
  // trunk left = slider进度width + trunk宽度/2
  scale() {
   return (this.per - this.min) / (this.max - this.min);
  },
  width() {
   if (this.slider) {
    return this.slider.offsetWidth * this.scale + "px";
   } else {
    return 0 + "px";
   }
  },
  left() {
   if (this.slider) {
    return (
     this.slider.offsetWidth * this.scale -
     this.thunk.offsetWidth / 2 +
     "px"
    );
   } else {
    return 0 + "px";
   }
  },
 },
};
</script>
<style>
.box {
 margin: 100px auto 0;
 width: 80%;
}
.clear:after {
 content: "";
 display: block;
 clear: both;
}
.slider {
 user-select: none;
 position: relative;
 margin: 20px 0;
 width: 400px;
 height: 10px;
 background: #e4e7ed;
 border-radius: 5px;
 cursor: pointer;
}
.slider .process {
 position: absolute;
 left: 0;
 top: 0;
 width: 112px;
 height: 10px;
 border-radius: 5px;
 background: #81b159;
}
.slider .thunk {
 position: absolute;
 left: 100px;
 top: -7px;
 width: 20px;
 height: 20px;
}
.slider .block {
 width: 20px;
 height: 20px;
 border-radius: 50%;
 border: 2px solid #409eff;
 background: rgba(255, 255, 255, 1);
 transition: 0.2s all;
}
.slider .tips {
 position: absolute;
 left: -7px;
 bottom: 30px;
 min-width: 15px;
 text-align: center;
 padding: 4px 8px;
 /* background: #000; */
 border-radius: 5px;
 height: 24px;
 color: #fff;
}
.slider .tips i {
 position: absolute;
 margin-left: -5px;
 left: 50%;
 bottom: -9px;
 font-size: 16px;
 color: #000;
}
.slider .block:hover {
 transform: scale(1.1);
 opacity: 0.6;
}
</style>
调用:
<template>
 <slider :min="0" :max="100" v-model="per"></slider>
</template>

<script>
import slider from "@/components/slider";
export default {
 data() {
  return {};
 },
 computed: {
  per: {
   get() {
    return 0;
   },
   set(val) {
    console.log(val);
   },
  },
 },
 components: { slider },
 mounted() {},
 methods: {},
};
</script>

<style >
</style>
以上就是本文的全部内容,希望对大家的学习有所帮助,也希望大家多多支持NICE源码。