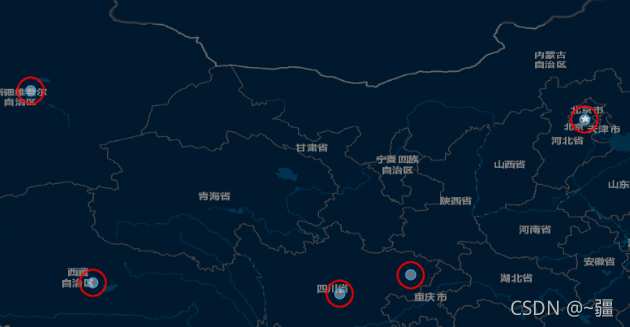
效果图:
实现代码:
<template>
  <div id="map" style="width: 100vw; height: 100vh" />
</template>
<script>
import "ol/ol.css";
import TileLayer from "ol/layer/Tile";
import VectorLayer from "ol/layer/Vector";
import VectorSource from "ol/source/Vector";
import XYZ from "ol/source/XYZ";
import { Map, View, Feature } from "ol";
import { Style, Circle, Stroke } from "ol/style";
import { Point } from "ol/geom";
import { getVectorContext } from "ol/render";

// 边界json数据
export default {
  data() {
    return {
      map: {},
      coordinates: [
        { x: "106.918082", y: "31.441314" }, //重庆
        { x: "86.36158200334317", y: "41.42448570787448" }, //新疆
        { x: "89.71757707811526", y: "31.02619817424643" }, //西藏
        { x: "116.31694544853109", y: "39.868508850821115" }, //北京
        { x: "103.07940932026341", y: "30.438580338450862" }, //成都
      ],
      speed: 0.3,
    };
  },
  mounted() {
    this.initMap();
    this.addDynamicPoints(this.coordinates);
  },
  methods: {
    /**
     * 初始化地图
     */
    initMap() {
      this.map = new Map({
        target: "map",
        layers: [
          new TileLayer({
            source: new XYZ({
              url: "http://map.geoq.cn/ArcGIS/rest/services/ChinaOnlineStreetPurplishBlue/MapServer/tile/{z}/{y}/{x}",
            }),
          }),
        ],
        view: new View({
          projection: "EPSG:4326",
          center: [108.522097, 37.272848],
          zoom: 4.7,
        }),
      });
    },
    /**
     * 批量添加闪烁点
     */
    addDynamicPoints(coordinates) {
      // 设置图层
      let pointLayer = new VectorLayer({ source: new VectorSource() });
      // 添加图层
      this.map.addLayer(pointLayer);
      // 循环添加feature
      let pointFeature = [];
      for (let i = 0; i < coordinates.length; i++) {
        // 创建feature,一个feature就是一个点坐标信息
        const feature = new Feature({
          geometry: new Point([coordinates[i].x, coordinates[i].y]),
        });
        pointFeature.push(feature);
      }
      //把要素集合添加到图层
      pointLayer.getSource().addFeatures(pointFeature);
      // 关键的地方在此:监听postrender事件,在里面重新设置circle的样式
      let radius = 0;
      pointLayer.on("postrender", (e) => {
        if (radius >= 20) radius = 0;
        let opacity = (20 - radius) * (1 / 20); //不透明度
        let pointStyle = new Style({
          image: new Circle({
            radius: radius,
            stroke: new Stroke({
              color: "rgba(255,0,0" + opacity + ")",
              width: 3 - radius / 10, //设置宽度
            }),
          }),
        });
        // 获取矢量要素上下文
        let vectorContext = getVectorContext(e);
        vectorContext.setStyle(pointStyle);
        pointFeature.forEach((feature) => {
          vectorContext.drawGeometry(feature.getGeometry());
        });
        radius = radius + this.speed; //调整闪烁速度
        //请求地图渲染(在下一个动画帧处)
        this.map.render();
      });
    },
  },
};
</script>
参考文章
到此这篇关于Vue+Openlayer批量设置闪烁点的实现代码(基于postrender机制)的文章就介绍到这了,更多相关Vue Openlayer闪烁点内容请搜索NICE源码以前的文章或继续浏览下面的相关文章希望大家以后多多支持NICE源码!